Monday, February 17, 2014

New Bathroom Cabinet...and I'm back to painting!!!

It has been a while since I have picked up a paint brush...and I cannot remember why.  I love to paint, and I love to transform pieces from blah or so-so to beautiful!!!  I got a chance this weekend and I just love how it turned out. 

Our bathroom is getting ready for a paint makeover.  Right now it has a big ole patch of brown in the middle of a light blue/green wall.  Why?  We took down a gross 1980's big huge cabinet that was over the toilet.  We hadn't decided what color to paint so we just picked something to cover the unfinished sheetrock...that's why a big brown patch!  But that's getting ready to change...

First things first, we had to put something in there to hold what went in the cabinet.  That's when we found this new piece.  I'm not sure it's original condition, but when we bought it they had painted and lacquered the whole thing...like a TON of lacquer!  You could almost see your reflection in it the thing was so shiny.  It was cream and brown...not the colors I was going for...but I know how to remedy that! 

Chalk Paint!!!

 
 Here's where it started.  The top left is the original piece...at least as we got it.  I added 2 messy coats of Maison Blanche's Chocolate paint.  I didn't paint it everywhere since I only needed it where I planned to distress the piece.  I then covered the whole thing in two light coats of Maison Blanche's Magnolia (which is a lovely white).  Since the top and side inserts were already brown I didn't have to under paint them, so I just covered them with Maison Blanche's Robin's Egg. 

The bottom right picture shows my husband, Eric, adding a MDF shelf.  I painted it just like the top piece after we cut it to size.  I wanted this under there to put the TP to keep it out of the main body of the cabinet.  I love this little addition!

Once I was done painting I let everything dry overnight so that it would be ready to distress.  My favorite method for distressing a piece is using a wet cloth.  I have a big bag of rags that we bought for cheap at Harbor Freight and Tools.  It's just a bunch of white cut up t-shirts, but that works for me.  When wet distressing it can take a bit to remove the paint, but it can also come off quickly.  Just an FYI...when your piece is lacquered heavily prior to painting it is easy to take off too much paint during the distressing process.  Be careful how heavy you scrub!!!  I learned that today...a little adventure needless to say.


One of my favorite parts of this piece is the legs.  I normally don't like this style, but it paints and distresses so beautifully.  I also love the scroll detail at the bottom.  When I purchased this piece I didn't even know that was there.  It was so monotone and lacquered that the detail was lost.  Not anymore!!!  Oh, and I love the brown peeking through the blue...so pretty (with a happy sigh!!!)

Next step is the finishing and this time I tried something new...Hemp Oil!  I saw a quick demonstration of this in Wichita when visiting family.  She literally wiped it on and voila...DONE!  No buffing, no problem!  I loved it.  I spent some time looking up some tips and tutorials for applying it since I've never worked with hemp oil.  I picked some up this weekend and grabbed a rag to apply it to the piece.  I started on the side and quickly realized that a rag, no matter how "lint free" it might be, would be a pain in the tail!!!  It shed as I applied it the whole time.  It was quite annoying.  I did both sides and the top then moved to the inside.  That's when I remembered Miss Mustard Seed saying that we could use a brush.  Bingo!!!


I went to my stash and grabbed a 4" chip brush and poured some oil out on a paper plate with higher sides.  Man, that is the way to go!!!  I highly recommend using a brush for Hemp Oil.  I'm not sure that it's a less expensive finish vs. furniture wax, but it sure does spare some elbow grease with no buffing required.  I also read that multiple coats of Hemp Oil can be used on a piece.  One of the other benefits of Hemp Oil is it's heat resistance.  Wax will melt under higher heat making it a pain for table tops and other such items.  Hemp Oil will not melt.  I don't believe it seals quite as well, but I like how it turned out at this point.  Also, it did tend to discolor my white paint a bit.  I don't recommend it if you're looking for a pure white finish.  That would call for the clear furniture wax.

After oiling the whole piece I decided it still needed a bit more character.  So after research I decided to add some dark wax.  I just hit the spots that would tend to get "dirty" to add some age to it.  It really came to life at that point.  I just love dark wax!!!


Just look at the dimension it adds to this piece.  I love variance in colors with shading here and there.  That's what dark wax on chalk paint gets you...which is why I love it so much.  I will probably have to buff the piece to make sure and seal up all that wax.  I may add a thin layer of clear furniture wax as well since it is going in the bathroom.  That should seal it from dampness.  Oh, well...hard work and elbow grease never hurt anyone!

The last major step (minus adding more wax...) was to finish off the door.  It looks like this piece used to have glass in the door, but it wasn't there when we purchased it.  No problem...that's just one less thing to clean...I can always add chicken wire.  Plus, that gives me someplace to put hair clips and such.  I also switched out the hinges and the door pull.  I found a beautiful knob at Hobby Lobby and since I'm bringing silver in with the chicken wire I loved the fact that it's silver as well.


It doesn't hurt either that the silver filigree is quilled!  I think quilling is beautiful so this works perfectly.  I haven't mentioned my baskets...that will be in a future post.  I purchased baskets at Hobby Lobby on sale last week.  None of them were the color they needed to be so I transformed them...well, I haven't quite finished that process.  I still have liners to sew for the white ones.  Ok, no more giving that project away.  I'll save it for later. 


Here's the finished piece!  It turned out awesome!!!  Now I just have to get the bathroom finished so I can pull it all together. 

Till next time...


Jennifer
Thursday, February 13, 2014

Buffalo Balls!!!

I have one of the pickiest group of kids.  Finding something to feed all 3 of them that everyone likes is quite a feat!  So when I do I have a small party...party of one, but it's a party!!!  In the past they have been very vocal about hating meat loaf and meat balls...but not this time!

Let me introduce you to Buffalo Balls (when you click on the link slide down...the recipe is there I promise)!  Funny name...makes your mind go "there" right...but they're SOOOOO good.  And guess what...EVERY ONE OF MY KIDS LOVED THEM!!!  Yep, party of one going on here!!! 

I did make a few changes from her recipe based on the ingredients I had.  First change: she used ground chicken or turkey.  I realize that this technically makes them buffalo style, but I only had ground hamburger so that's what I used.


I was going to be brave and stir this by hand...yeah, that's WAY too cold!!!  My hand was burning.  This large Pampered Chef spatula did the trick! 


To scoop the mixture into balls I used another Pampered Chef tool I have.  This is the medium scoop.  It's approximately 2 tablespoons and my number one go to for two-bite sized balls.  Ok...you can quit laughing now!!!


Once I got them all scooped I put them in the fridge to chill.  I did this early in the day since we had a busy night and I needed to get dinner done fairly quick.  It made it easy to plop them on the pan and cook since the prep was pretty much done.  I sprayed the pans with coconut oil spray and popped them in the oven.


Second change: and this one might have been because of my first difference...I had to cook them for 15 minutes to start then I cooked them an additional 10 and followed the rest of her recommendations for cooking time.


Third change: she said to use Frank's Red Hot for the hot sauce.  I couldn't find it at the store I was in but I found a sugar free version called Wing Time Parmesan Garlic that worked equally well.  I added sauce to the end as well.


I'm thinking you're probably grossed out by all the grease in the pan.  Personally the fat is something I need for my diet, but this picture was taken after the first 15 minutes of baking as I was dredging the balls in the sauce.  It cooked another 12 minutes or so and most of that grease was gone by that time.  I also scooped them out with a slotted spatula which left some of the oil behind.  Nevertheless...it was GOOD!


Here they are all dished out.  I made up some ranch dressing (still working on finding the best recipe for that) for dipping, but they did NOT need it.  It was good with the ranch, but better on their own. 

 
My kids actually fought over the leftovers!  But mama got her's set aside first...and they were even better the second day!!!
 
Try these out...they're simple and delicious!!!
 
Till we meet again...
 

Jennifer

Tuesday, February 11, 2014

Breads, Breads, Breads...

Remember how much I love bread?  Remember the peanut bread?  Well, I've found some more bread recipes to experiment with. 

I liked the peanut butter bread.  It was a great consistency, but I made some mistakes in the ingredients as I think I mentioned.  Plus it was very salty...my mistake.  I ended up throwing it out.  But I found a couple new recipes, and low and behold I had all the ingredients to play with. 

Here's where I started...


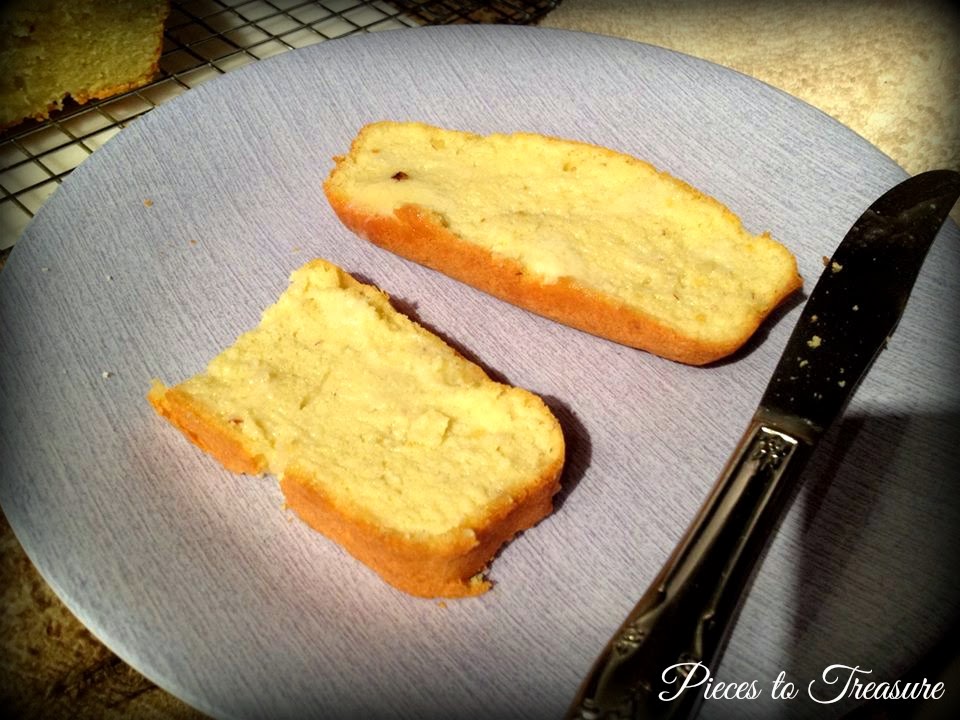
 I went in search of a coconut flour bread, and I ended up at Sugar-Free Low Carb Recipe blog.  I think the first recipe I spotted was a banana bread.  Bananas are very high in carb...I think one of the highest fruits you can find.  She had others though, and that's when I spotted this one...Basic Quick Bread.  It's all made in a food processor and it was really easy.  It has a TON of eggs though...8 to be exact...which makes it pretty high in protein, but a bit eggy tasting as well.  It bakes beautifully though and has a great texture. 

I had to cut it right away...impatient bread lover that I am.  I didn't even toast it; I just cut and buttered!!!


Oh, I may have added a bit of sugar free honey... ;-)


It reminded me a bit of corn bread.  Not too bad...still a bit dry/dense, but that's comparing it with white yeast bread.  But as far as bread goes it's edible.  This morning I tried to toast it and it doesn't toast quickly.  So I took it out of the toaster and buttered both sides and toasted it in a skillet...kind of like making grilled cheese and it ends up looking a little like French Toast.  I treated it like French Toast and poured a little sugar free syrup on it (same brand as the honey).  It was very good!!!  Great breakfast this morning, and QUICK!!!

Here was bread experiment #2.

I continued my search on the same blog for a pumpkin bread.  I've read pumpkin is very good for you and I love pumpkin in pretty much all dessert forms.  I finally came across Low Carb Gluten Free Pumpkin Bread.  This recipe is done in a mixer or a bowl with a hand mixer vs. the food processor.  I used xylitol as the sweetener and discovered that mixing xylitol with the wet ingredients without any dry ingredients isn't the best idea.  It gummed up on the paddle attachment on my mixer.  BUT...once I added the dry ingredients it mixed in fine.  Next time...and there WILL be a next time...I will mix the xylitol with the dry ingredients then add them to the wet at the end.  I also used pecans vs. walnuts.  I am not a walnut fan and I had pecans in my pantry...no brainer!  Here again this bread has a bunch of eggs...another 8 (it's a good thing I purchase my eggs at Sam's Club 36 at a time).  The batter is thick and doesn't rise a lot, and it took approximately an additional 10 minutes to cook, but BOY...it was GOOD!!!


This one was so good I didn't even get a picture before it was cut and eaten.  The bread isn't gone yet, but it will be quickly...and it has the approval of my non healthy eating son!  He actually called it good!!!  Score one for Mom!!!

That's it for today.  Tomorrow I'm going to try my hand at Buffalo Meat Balls!  Doesn't that sound YUM!

Till then...


Jennifer
Saturday, February 8, 2014

Peanut Butter Bread and Caramel Sauce

I posted about Lisa's Peanut Butter Bread yesterday, and I was able to make it yesterday afternoon.  It was really good.  I need to make some adjustments on my end...piece of advice, don't use fresh ground peanut butter unless it has enough oil in it.  The one I had was very dry.  I tried adding some butter to add oil to it, but next time I will use natural peanut butter from Smuckers or some other trusted brand.  Anyway, I also made 1 1/2 recipes of Lisa's bread so that I could get a fairly good sized loaf out of my loaf pan.  Here's how it came out...


I think I added a bit more than 1 1/2 times the salt so it was a bit too salty, but that was my adjustment that I'll work on next time.  The bread has a wonderful consistency and I can't wait to toast it and make over easy eggs to go with it!!!

Next I made up more chocolate syrup.  I didn't picture that because I've already blogged how to do that here.  I needed some more caramel sauce as well so I whipped up a batch of that.

You all know how much I enjoy Maria Mind Body Health blog.  She has several different ways to make Caramel sauce.  I love caramel...pretty much anything...so this works for me!  I use xylitol as my sweetener so I had to use her xylitol version


I've made this before and had some issues with it.  She says to boil the xylitol, but it smokes way before it boils and begins to get a smoky, bitter flavor.  The point of boiling the xylitol is to get it to brown, but I noticed last time that once the butter was in the xylitol it began to get a darker color.  So this time I made a change. 


I melted the xylitol till it was completely clear (there will be "grains" of xylitol that will melt if you get it hot enough...it almost looks like bubbles).  I didn't let it get to the smoke point.  I added the butter, stirring the whole time, and cooked it till the butter browned.  It started to get a little smoky...not much, just a little...then I took it off the heat.  I waited just a couple of seconds then stirred quickly with a wooden spoon while drizzling in the cream. 


I stirred the mixture till the bubbles were gone.  I immediately poured the caramel sauce into a pint sized wide mouth mason jar.  I don't know if this is the right time or if I should have done it before, but I added 3 twists of Celtic Sea Salt salt grinder to make it a lightly salted caramel. 


It is MUCH better this time.  I couldn't even wait for it to cool completely.  I cut a couple of pieces of bread to try it out, toasted it up, buttered it and added a drizzle of caramel sauce.  YUMMMMMM!!!


Replacing all those things I love for something I love more...and yet still being able to enjoy a version of it...well I think that's priceless!!!  If I can do it then so can you!

Till next time,


Jennifer
Friday, February 7, 2014

Breads that are good for you!!!

I have had a very busy week.  I have a teen, a preteen and a daughter who thinks she's a preteen. They keep me hopping all around town.  For instance, today my teen is half a state away in a Jazz competition...so I'm busy praying he stays safe.  The other two have an early release day today so I have to leave in about an hour to get them both.  I want to bake or cook, or bake and cook, but we have been busy all week long.  Thank the Lord I had leftovers from our Super Bowl Sunday.  We've been fending all week on leftovers and quick items.  For me fending means a couple of eggs scrambled, some cheese and deli meats, a one minute muffin or a couple of pancakes made gluten free and low carb. 

Last night I had Bible study with a friend of mine, Lisa.  She is the author and contributor of the 24/7 Low Carb Diner blog and the cook books Low Carbing Among Friends.  She gives me so much useful information and I'm sure I just drive her crazy with all my questions.  I so appreciate her wisdom.  While we were discussing all my inquiries she mentioned that she had a peanut butter bread recipe that works very well for a bread replacement.  So last night I went searching on her blog and found the recipe.  Not only does it look easy, but there are a TON of testimonials on how good it is.  So today I am going to try this recipe...after I pick up the kids that is.


http://247lowcarbdiner.blogspot.com/2011/03/mr-peanut-sandwich-bread.html
Lisa's Mr. Peanut Sandwich Bread courtesy of 24/7 Low Carb Diner
 But that's not the full purpose of this post.  Since I was already pinning I started searching for more bread replacement recipes.  See I love bread!  In case you didn't get the full impact of that statement I'm going to say it again...I LOVE BREAD!!!  I'm not kidding...I love it!  I love biscuits, sliced warm right out of the oven bread with lots of butter, toast, rolls, croissants, etc.  I love garlic French bread.  I love sour dough bread dipped in soup.  Do you get the picture?  Surprisingly I've been able to avoid bread without too much temptation, but if I'm going to do this life change I know I will need a bread replacement.  So therefore the search!!!  I found a bunch of replacement breads that I love and I'm going to share the links to several of them today so if you decide to make this change you can find them too.

Low Carb Gluten Free Pumpkin Bread
Zucchini Bread
Basic Quick Bread
Diner Style Coconut Pancakes
Coconut Flour Buns - for cheeseburgers
Mozzarella Cheese Biscuits (with a variation to make them like Red Lobsters...oh YEAH BABY!!!)
And many more...click here for my Changing my life - Breads board

This is possible!  We can do this!  With a few adjustments, some time and patience it is possible to make the changes necessary to be the best you (or me) ever!!! 

Want proof...this week I've purchased 3 sized smaller jeans, undies and bras...all out of necessity!!!  3 sizes...in about 5 months!!!  It can be done!

Till next time...


Jennifer
Monday, February 3, 2014

Super Bowl Fun!!!

Today has been a fun day.  It's almost like a holiday.  I love football; I love a great get together with friends.  Combining my two loves...awesome!!! 

I was the host of this year's Super Bowl party...by my own choice.  Why?  I wanted to make sure that I made some delicious foods that I could eat.  I never want to force anyone to eat this new way nor to cater to me because it's my choice.  But if I'm hosting then I get to choose!  Win for me!!!  So I've spent the last week or so perusing all the blogs I follow looking for great Super Bowl recipes.  Here's the ones I chose:


Crispy Nut Crackers
I decided to make these Crispy Nut Crackers by Jennifer at Splendid Low Carbing.  They were easy to make, but I'd like to do some tweaking with the flavor.  It was a bit dry and bland, but the cracker tends to be just a vessel to get dip from a bowl to my mouth so I can handle that!
 
 
Pepperoni Chips
Next on my list were these Pepperoni Chips by George Stella.  He posts his recipes to Facebook via Low Carbing Among Friends page.  If you haven't liked that page and you want to try this new way of life out then I suggest you hit that LIKE button.  I made these almost exactly as George says except I omitted the final baking.  When I opened the door to check them after about 9 minutes smoke came rolling out.  I don't know if it was the pepperoni or the parchment paper, but something was smokin'!  And yes...it did set off the smoke detector.  But they're very good!  I love crispy pepperonis!!!
 

Black Bean Flourless Cake
Now, I've heard that beans aren't the best for a low carb way of life.  I guess they turn to sugar somewhere deep inside...LOVELY!!!  But one of my friends let me know it was better than the alternative and it's not that high in carbs so I thought I'd try it out.  I really wanted a sheet cake like my mom used to make when I was a little girl so I found this recipe and just used a sheet cake pan vs. the 9" one recommended.  This site is a share sight for recipes so I don't know who to give credit to...but it was GOOD and no one even knew it was black beans!  SCORE...hee hee hee love the pun!!!
 

Chocolate Ganache

What chocolate cake isn't complete without a yummy frosting.  And you cannot go wrong with a Chocolate Ganache.  For that I went to my trusted source Maria from Maria Mind Body Health blog.  I have had so much success following her recipes that I turn to her most often than not.  I added a 1/2 cup of Xylitol for the sugar and no Stevia.  I don't have a love for Stevia...although I'm trying to add it a bit at a time as recipes call for it.  Perhaps one day my taste buds will get used to it. 
 
 
Here's the final marriage of the Black Bean Cake and Chocolate Ganache...yes it is as good as it looks.  If you want to make this lovely confection follow the directions to a T, add in your favorite sugar substitute in place of all that sugar, pour in a greased sheet cake pan and bake for approx. 20 minutes or until a toothpick comes out clean.  Let cool for about 30 minutes (you're ganache needs to cool that long too so that it's not too runny).  Pour the ganache over the cake and spread out evenly.  Cool in the fridge for a couple of hours to set the ganache.  Take the cake out and slice it and serve at room temperature.  The cake is SUPER moist (yet another pun/plug for the Super Bowl)!!!
 
Chicken Enchilada Dip
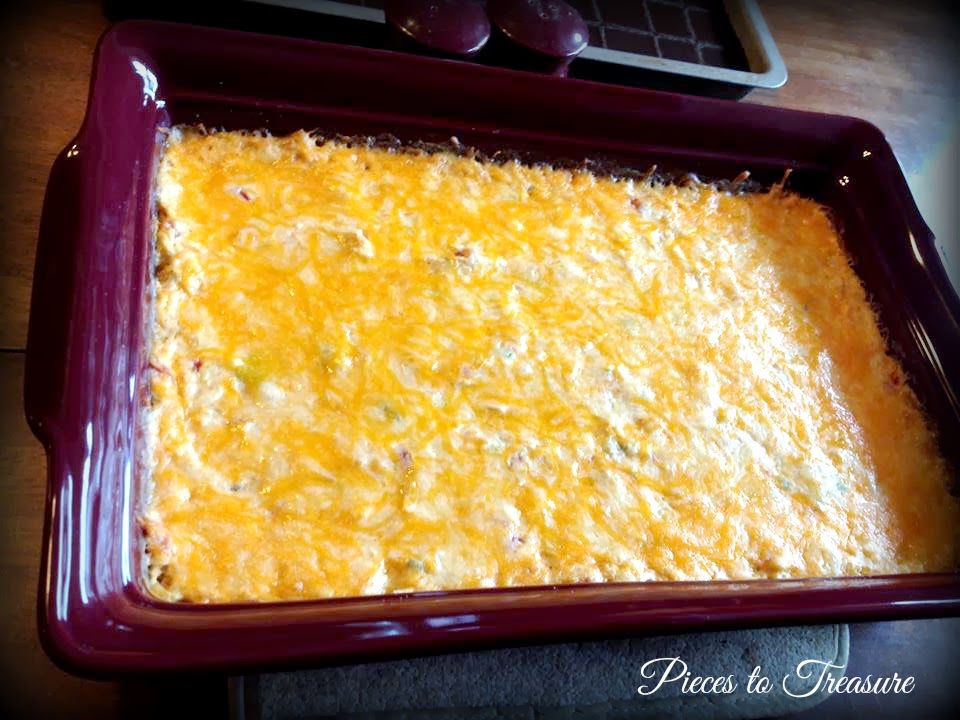
I went back to Jennifer at Splendid Low Carbing for this Chicken Enchilada Dip!  Man, it was good!  Unfortunately I didn't taste it warm since I had so much going on, but it was delish cold...so I assume it was awesome-er hot!!!  I made no changes except that I had Colby Jack vs. Cheddar cheese.  It went pretty darn good with my Nut Crackers.  Half the pan was gone by the end of the night!
 
Olive Garden's Zuppa Toscana
The star of the evening was our entrée Zuppa Toscana.  This is a HUGE favorite with my friends and a recipe that one husband has duplicated himself.  Everyone loves it whenever he makes it so I had to give it a go...and it worked!!!  I doubled the recipe using one pound of sweet Italian sausage and one pound of hot Italian sausage.  I did NOT double the red pepper flakes since I used the hot sausage and not everyone likes it hot and BOY we didn't need the extra heat.  It was enough to melt the snow outside that's for sure.  But everyone loved it and this dutch over that was practically full is now nearly empty! 


So who did I do all this for???  Here's just a few of the friends who joined us tonight...


There were kids all over the house...as well as a photo bomber...but there were no injuries and nothing broke so all is well. 
 
I hope you had an equally fun evening enjoying the commercials Super Bowl!!! 
 
Till next time,
 
Jennifer
Sunday, February 2, 2014

Happy Birthday to my Sister!!!

I'm going to love on my sister, Jeannine, today.  It's her birthday and she turns...wait, I'm loving on her I guess I should leave that part out.  Not that she's old or anything.  She is my YOUNGER sister. 


Here she is!  Isn't she beautiful?!?  You might know her as Jeannine from The Concrete Cottage.  Yeah, she's an amazing decorator and crafter.  She is my inspiration for so many things.  She has such an amazing eye for detail...it can make an older sister a little green with envy...if I didn't love her so much.  Here's just a little taste of who she is...


Little Sis!!!

She's the youngest of three, the most brave and daring and full of mischief!  Oh, that's our brother Charles in the middle there.  What a bunch of cuties we were!!!


Lifetime Friend!!!

We were the Maids/Matrons of Honor in each other's weddings.  I have best friends, but she has been my lifelong friend.  We've spent many nights laughing together, fighting with each other, crying together...just living life together.


Wife!!!

Hey, she can keep this guy in line...what more can I say...LOL!!!


Mom!!!

These beautiful and handsome rascals are hers.  They're every bit their mother's children...and I love them immensely!!!


Baby Lover...or in other words NURSE!!!

She always loved hospitals.  Why I never knew, but she always did.  We always fought over who got to hold the baby...whatever baby might be around.  And now she gets to spend time in the hospital holding babies!!!  Yeah, I guess she ultimately won that fight huh???


My Inspiration!!!

She wrote a blog post the other day revealing her newly decorated craft room.  In the post she had a picture that caught my eye.  I have a chalk board (a copied idea from her) that I love to decorate (also because of her), but I have difficulties getting the chalk to cooperate.  I've been looking for chalk pencils (do they even make such a thing...I haven't found any yet), and in this one picture my sis had a bowl with a piece of chalk and a pencil sharpener.  BRILLIANT!!!  I tried to copy her...yet again...today and failed!  Why?  My sharpener didn't have a large enough opening, and I couldn't find one of those cheap ones that all students have with the smaller and larger openings.  I needed it for this project.


See, if you ever go into my sister's kitchen you'll find all kinds of cool jars and such with chalk board labels that you can write the contents on.  In this new way of life I have to make all sorts of things you'd normally just buy in the store.  Things like salad dressing, mayonnaise, caramel and chocolate sauce...and you need something to put them in.  That's where Hobby Lobby comes in especially when glass is 50% off.  And since I have that lovely machine called a Silhouette Cameo (thanks to my sister who taught me what it was) and access to chalkboard vinyl, I could make labels on the lids to mark what's in the jar.  But, since I didn't have sharpened chalk to help me write neatly this is what I ended up with...


At least it works to identify the contents...and that is the whole purpose isn't it!

So, Sister, thank you for inspiring me, for broadening my crafting horizon, for being my friend, for being YOU!!! 

I love you...Happy Birthday!!!


Jennifer